
Attempting to transfer your email address to another provider can be problematic. Or, at least, the exact steps aren’t that obvious at first, especially since we don’t usually do these things very often.
The good news is that the task is not that difficult to execute. However, there are still specific things you need to do to ensure a smooth transition and ensure no emails are lost in the process.
In the following guide, we will cover the most common scenario where users want to transfer email address to another provider.
This guide applies if:
 - you are moving your email to a new provider/host
 - you want to keep your current domain name, e.g. eg youritio.com
 - you want to keep the same email address, e.g. eg [email protected]
 you want to keep using your old email tool (Gmail, Apple Mail, Thunderbird, whatever)
 you don't want any downtime or lost emails!
Let’s illustrate how to get through the process in cPanel – it’s the most popular control panel in the web hosting industry. Most web servers use it. If your provider uses something else, we’ll also try to point you in the right direction and help you through the process.
Let’s get started:
Overview of transferring email address to another provider
The easiest and fastest way to transfer email address to another provider is as follows:
- Sign up with the new provider/host. Set up your domain name there.
- Create the exact same email address on the new server.
- Redirect your domain name: point it to the new server.
- Clean up the old server.
1) Sign up with new provider, set up domain
Before you do anything else, you must have your new web hosting account fully set up and everything paid for.
We assume you’ve already done this, so we won’t spend too much time explaining the basics. If you’re still on the fence and not sure which email hosting provider to choose, here are our favorite platforms:
The first thing to do in terms of setting up your new hosting is to set up your domain name there.
To get started, log in to your cPanel account, go to Domains.
Fill out the following form:
- Domain. Your domain name.
- Document root. It can be a completely new directory name. I usually just enter my domain name with a _ instead of the period, e.g. Eg mysite_com.
Click SUBMIT.
Once this is done, your server is now ready to “receive” your domain name.
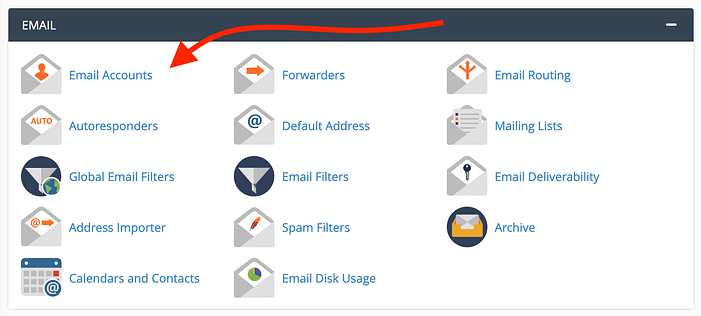
2) Create an identical email address on the new host
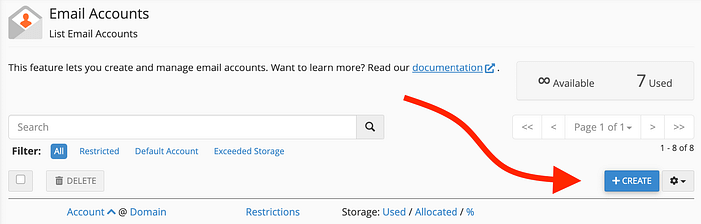
In cPanel, go to Email Accounts.
Click on create
You will see the following form
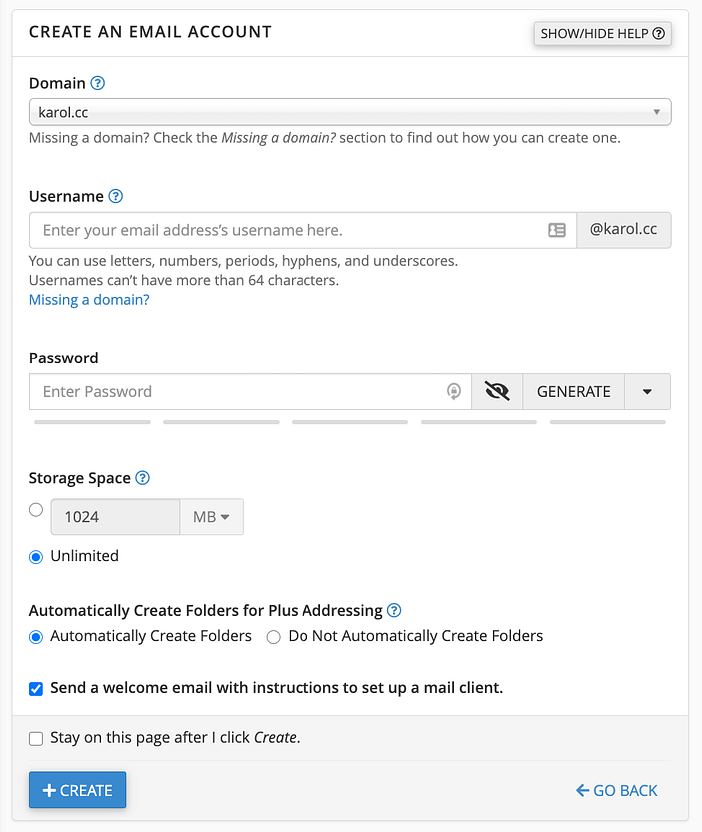
Domain. Select your domain name from the list, the one you added a minute ago.
Username. This is the identifiable part of your email address, the part that comes before the “@” sign. This step is crucial! The email address must be identical to the one you are currently using. This means you have to use the same spelling and capitalization. For example, if the email I want to migrate is [email protected], in the Username field, I must enter Karol – capitalize.
Password. Please enter a password. It may be the same one you are using now, but it may also be brand new.
Storage space. Best set to Unlimited.
Leave everything else as is.
Click + CREATE.
You will see your email account listed.

Once this is done, you now have the same email address set up with both your new email hosting provider and your old provider.
3) Redirect your domain name
This is a good time to redirect your domain name to the new host.
⚠️ Important; In the previous step, we only set up your domain name on the new server, but the domain itself has not been redirected to that server yet. The new server is just “ready” to receive that domain, so to speak.
The tricky part about this step is that these things tend to differ from host to host and registrar to registrar.
💡 Note to beginners: A domain name registrar is the company that registered the domain name for you.
In general, you have two paths you can choose from:
a) Redirect everything that uses your domain name
b) Redirect only emails
a) Redirect everything that uses your domain name
This includes not only all email addresses under your domain name, but also your website, databases, and everything else that uses your name Of domain. Basically, this is your path if you’re moving to a new host entirely.
In this case, the easiest way to redirect your domain name is to change the “name server” addresses assigned to your domain name configuration. You can make this change through your domain registrar, the company where you originally registered the domain name.
To do that:
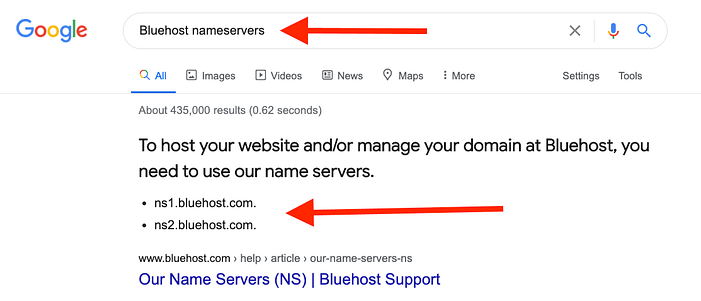
First, check what the nameserver addresses of the new host are. You can find that information on your host’s user panel, or you can start a support chat and ask for the details there. If you are using a popular host, like Bluehost for example, you can simply Google this information:
Next, set up these new nameserver addresses with your domain registrar. Again, depending on the registrar you’re using, you may find these settings in different places. To make this faster, you can contact the support team and they will walk you through the process or even set the new nameservers for you.
For example, if you’ve registered your domain name with GoDaddy, a popular registrar, you can find the nameserver settings in the main user panel. First, click DNS next to your domain name:
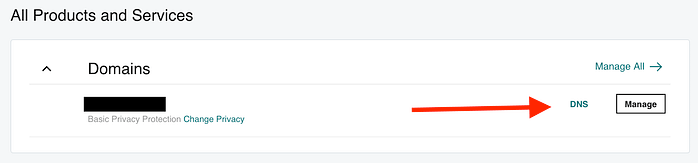
On the next page, scroll down to the Nameservers section and click Change. Enter the new nameserver addresses there.
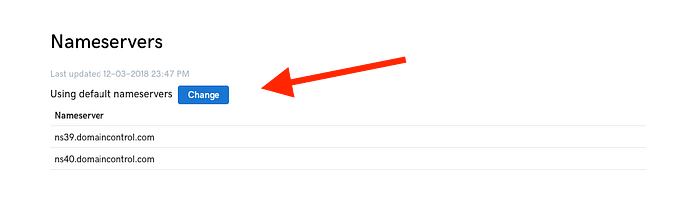
You will find similar interfaces with other domain registrars.
b) Redirect emails only
In this case, you will only get a new provider for your email while leaving your website and everything else with your current web host.
To do this, we’ll use so-called MX records for your domain. From a user’s point of view, an MX record is a simple note that specifies the address of the mail server you are using.
As with nameservers, setting up MX records works differently with every web host and domain registrar.
First, go to your new email host and find out what their MX addresses are. The fastest way to get this information is to contact the host’s support team.
Once you have these values, you will need to establish them with your domain registrar. Again, depending on the registrar you’re using, you may find these settings in different places. The support trick works here too. Simply contact the registrar’s support team and ask where to set up MX records for your domain.
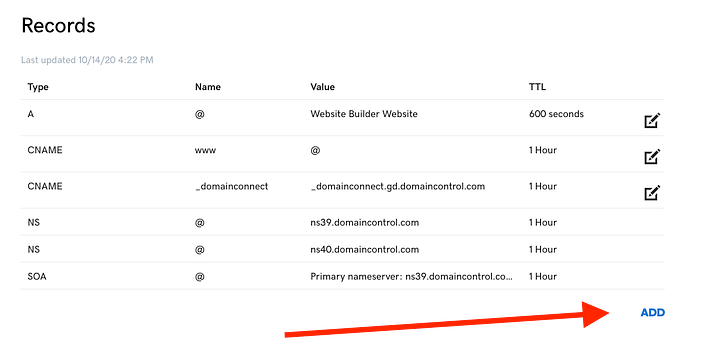
For example, if you have your domain at GoDaddy, log in to your user panel and click DNS next to your domain name:
On the next page, click ADD below the list of current records.
From the dropdown menu, select MX and fill in the remaining fields as appropriate, based on the MX values provided to you by your new hosting provider.
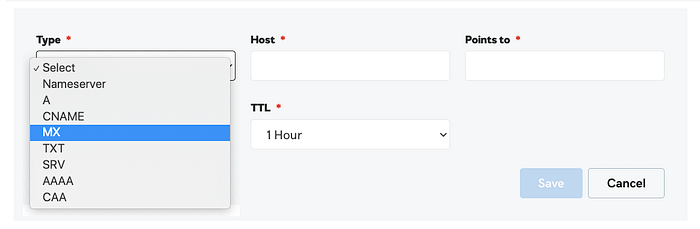
When you approve the changes, your domain will be correctly redirected.
4. Set up the new provider in your email tool
We’ve already created an identical email address with your new provider and also set up a redirect that will send all new emails to that new provider.
The main thing you need to do now is set up that new email address in your email tool (Gmail, Apple Mail, Thunderbird, whatever you’re using).
Go back to cPanel on your new host and click & nbsp; Email accounts
Click on CONNECT DEVICES next to the email address that you’re migrating to the new host.

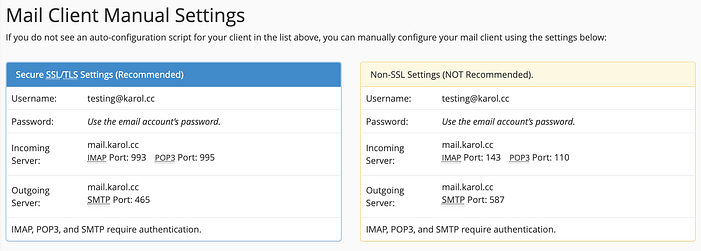
On the next page, you’ll see all the details you need to set up this email in any email tool.
The first section is where you can find automatic configuration files for some of the more popular tools.
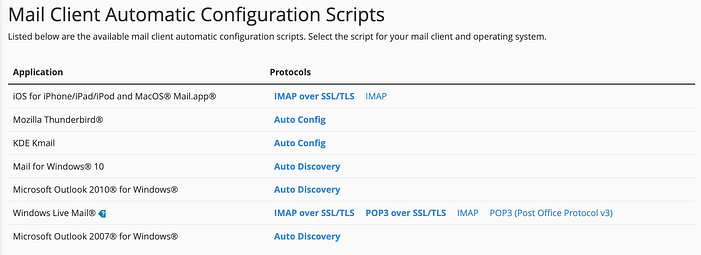
- The second section shows the raw configuration details, which you can use to configure your email by hand in any tool.
Clean and go!
After a couple of days, you can remove that old email setup from your email tool. You can also cancel the old email server. Your email address has now been fully migrated to the new provider!
Remember that when you decide to host your website on phluit you don’t have to worry about creating your email accounts. We take care of this and much more. If you are not yet a client of phluir. Check out our plans!